Now that the NoCAN IoT platform is finally here, it's time to discuss what you can do with it! If you are not familiar with the NoCAN platform, you might want to check out our introduction to the NoCAN platform.
As a first example, let's look at a scenario where you want to collect weather data from a sensor placed in a remote area of your garden or in a greenhouse. For this task, we picked a BME280 sensor from Sparkfun, which provides temperature, humidity and barometric pressure with good precision (note: Adafruit also makes a similar sensor). We will connect the sensor to a CANZERO node and put it in a protective electrical box outside. The CANZERO node will be connected to a NoCAN network managed by a PiMaster HAT connected to a Raspberry Pi. Data collected by the sensor will be broadcasted every 10 seconds to the network.
Let's build it!
Connecting the sensor
The SparkFun BME280 sensor can be connected to an Arduino or any microcontroller with I2C or SPI, and works at 3.3V. For our connection to the CANZERO, we picked SPI but it would be easy to switch to I2C if needed. The CANZERO works at 3.3V, so no voltage level shifting is necessary here.
The CANZERO shares the same pinout as the Arduino MKR Zero. The connection is summarized in the table below.
| CANZERO / MKR Zero pin | BME280 pin |
|---|---|
| 7 | CS |
| 8 (MOSI) | SDI |
| 9 (SCK) | SCK |
| 10 (MISO) | SDO |
| GND | GND |
| 3.3V | 3.3V |
The connection is represented in the following diagram.
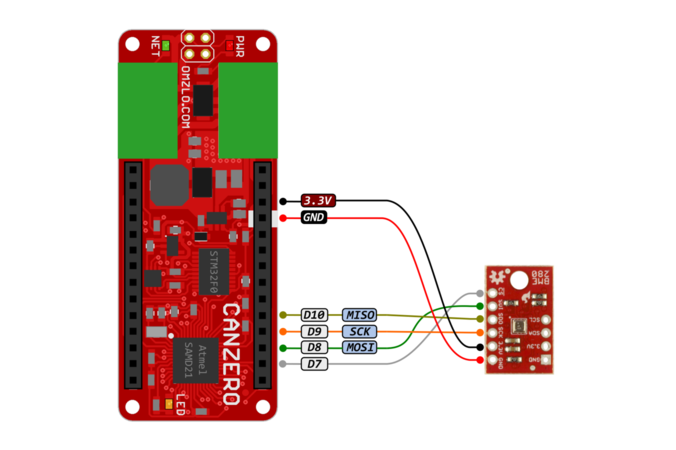
For simplicity, we used simple jumper wires to make our connection. We plugged them in the CANZERO and soldered the other ends to the BME280 sensor.
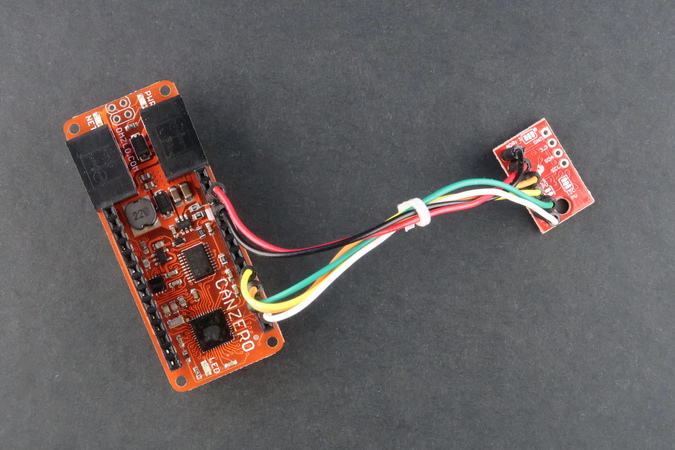
We are now ready to put the CANZERO node in our network.
Building the network
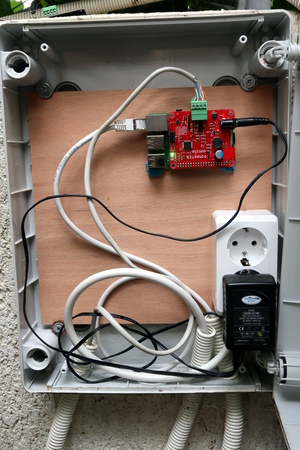
We installed a Raspberry Pi model B+ with a PiMaster HAT outside in the garden in a big electrical enclosure that is well protected from water (rated IP65). Two external cables bring electric mains and Ethernet to the enclosure. A small DC wall-wart transforms mains down to 12V DC, powering the PiMaster, the Raspberry Pi and the whole NoCAN network with just one connection. The Ethernet cable provides a robust network link between the house and the Raspberry Pi.
Our big tutorial describes the connection of the Raspberry Pi, the PiMaster, and the associated cabling. As suggested in the tutorial, we also used UTP (Ethernet) cables to build our NoCAN network, as shown in the picture below.
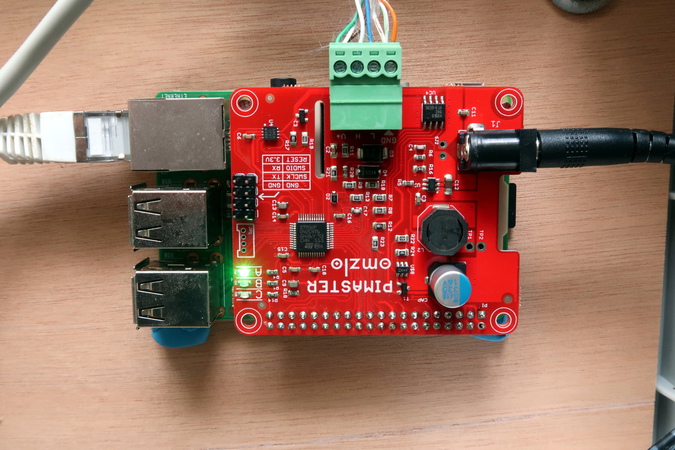
The UTP cables supporting the NoCAN network are then connected to the CANZERO node, which was itself installed in a small 8cm square electrical box, as shown below. The sensor was isolated from the CANZERO with some plastic wrapping, so as to expose the sensor to the outside environment while maintaining the CANZERO unexposed. Even though we sheltered the sensor from rainfall and any direct contact with water, the SparkFun BME280 board is probably not designed to be exposed in such a way to the elements and is likely to fail in the long term without additional protective measures (e.g. conformal coating).
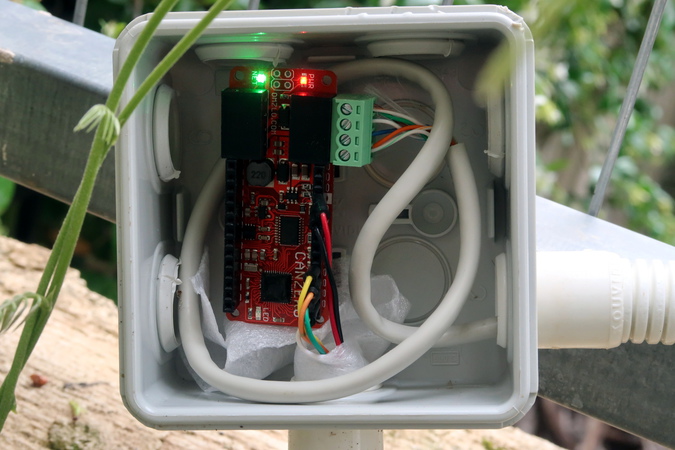
For a description of the installation and connection of a CANZERO node, we refer the reader to our tutorial.
The UTP cables are placed in flexible electric tubing, isolating them from humidity in the garden.
The hardware is now complete: time to move to the software!
Launching nocand, the network manager
We log in to the Raspberry Pi with a terminal shell and install nocand, following the instructions detailed in our tutorial.
A good way to keep nocand running in the background is to use the screen utility, simply by typing:
screen ./nocand
If you lose the shell connection to the Raspberry Pi, you can log in again and reconnect to the session by typing screen -r. You can disconnect from a screen session at any time by typing Ctrl-a d on the keyboard.
At this stage, the firmware that is necessary to drive the BME280 is not installed on the CANZERO yet but it's good to check that the network is correctly connected, using the following indicators:
- The green LED on the CANZERO node should be fully on, not blinking.
- Using the nocanc tool and typing
nocanc list-nodesshould list the CANZERO node as installed in the network.
For more info on testing your setup, see the relevant section in our tutorial.
Building the firmware with Arduino
We will write the BME280 firmware of our CANZERO node as a sketch in the Arduino IDE. We assume that the CANZERO board description has already been installed in the IDE.
We will also need to install the libraries necessary to use the BME280 sensor. When we initially started playing with the BME280, we found out that the simplest solution was to use the "Adafruit BME280" library (despite using a SparkFun sensor). To download the Adafruit BME280 library, go to Sketch > Include Library > Manage Libraries and use the search box to locate adafruit bme280. You will also likely need the "Adafruit Unified Sensor" library, which can be found by going to Sketch > Include Library > Manage Libraries and searching for Adafruit Unified Sensor.
We used the following sketch.
#include <SPI.h>
#include <Adafruit_Sensor.h>
#include <Adafruit_BME280.h>
#include <nocan.h>

#define BME_SCK 9
#define BME_MISO 10
#define BME_MOSI 8
#define BME_CS 7

#define SEALEVELPRESSURE_HPA (1013.25)

Adafruit_BME280 bme(BME_CS); // hardware SPI

unsigned long delayTime;
NocanChannelId temperatureChannel, humidityChannel, pressureChannel, altitudeChannel;


void setup() {
    // put your setup code here, to run once:
    Nocan.open();
    Nocan.registerChannel("bme280/temperature", &temperatureChannel);
    Nocan.registerChannel("bme280/humidity", &humidityChannel);
    Nocan.registerChannel("bme280/pressure", &pressureChannel);
    Nocan.registerChannel("bme280/altitude", &altitudeChannel);

    bool status;

    // default settings
    status = bme.begin();
    if (!status) {
        while (1);
    }

    delayTime = 10000;

    delay(100); // let sensor boot up
}


void loop() {

    publishFloat(temperatureChannel, bme.readTemperature());
    publishFloat(humidityChannel, bme.readHumidity());
    publishFloat(pressureChannel, bme.readPressure());
    publishFloat(altitudeChannel, bme.readAltitude(SEALEVELPRESSURE_HPA));
    delay(delayTime);
}

void publishFloat(NocanChannelId cid, float f)
{
  String f_s = String(f, 2);
  Nocan.publishMessage(cid, f_s.c_str());
}
The sketch creates 4 channels called "bme280/temperature", "bme280/humidity", "bme280/pressure", and "bme280/altitude" respectively. Then, every 10000 milliseconds (10 seconds), we read the data from the sensor and broadcast it on dedicated channels.
Note: Other CANZERO nodes could be added in the network and subscribe to these channels, and react to their value, e.g., activating a heater in a greenhouse when the temperature falls below a certain threshold.
Once compiled and exported to a compiled binary (see Sketch > Export Compiled Binary in the IDE), the firmware can be uploaded to the CANZERO with the nocanc tool, which should typically be installed on the same machine as the one running the Arduino IDE:
$ ./nocanc upload ~/Documents/Arduino/nocan_bme280/nocan_bme280.ino.omzlo_canzero.hex 1
Progress: 100%, 0 bytes, 0 bps
Done
Collecting the data
The simplest way to collect weather data is to use the nocanc utility to list existing channels.
Assuming you have only one CANZERO node in your network, the output of the command should look like the example below.
$ ./nocanc list-channels
# Channels:
UPDATED #0  bme280/temperature  "18.51"
UPDATED #1  bme280/humidity "85.07"
UPDATED #2  bme280/pressure "96464.69"
UPDATED #3  bme280/altitude "412.75"
To read a particular channel, you can use nocanc read-channel with the channel name as a parameter:
./nocanc read-channel bme280/temperature
UPDATED #0  bme280/temperature  "18.44"
You can further process the output of this command in a script. For example on a Linux or Mac OS X system, you could type:
TEMPERATURE=`./nocanc read-channel bme280/temperature | cut -f 4`
echo "The temperature is $(eval echo $TEMPERATURE) Celcius"
If the bme280/temperature channel reads a value of "18.44", these commands will output The temperature is 18.44 Celcius.
That's it!
To stay updated on the NoCAN project, don't forget to follow us on Twitter or on our Facebook page.

Comments
GQrYAkbfIxT
BRWJdlMuhoH, over 3 years agodvPpBTaStbIfUAs
sMEFiwSUeaY, over 3 years agoVETJN0LXRVO6 www.yandex.ru
VETJN0LXRVO6 www.yandex.ru, over 3 years agouyrturytjyf: www.mail.ru
uyrturytjyf: www.mail.ru, over 3 years agoSHKM70TOHHR6 www.yandex.ru
SHKM70TOHHR6 www.yandex.ru, almost 3 years agoCMDK4QWLK9CP https://www.msi.com
CMDK4QWLK9CP https://www.msi.com, over 2 years agoST1PT9A5HM https://dzen.ru sgjvhnbtcbtfgdjgfb
ST1PT9A5HM https://dzen.ru sgjvhnbtcbtfgdjgfb, over 2 years ago3Y1AML9LQGFP www.ya.ru 3Y1AML9LQGFP
3Y1AML9LQGFP www.ya.ru 3Y1AML9LQGFP, over 2 years agoLBrvIxbP
xDPgQLKyneITE, over 1 year agotPLympSWGNauiq
iIqCaELUNkT, over 1 year agoНа данном сайте представлены качественные витамины для мозга. Эти витамины способствуют повышения концентрации. https://travis2pq7u.bloggadores.com/31460946/витамины-для-мозга-Основы-Разъяснения
StevenGagma, about 1 year agoНа этом сайте вы найдёте полезную информацию о витаминах для поддержания здоровья мозга. Также здесь представлены рекомендации специалистов по выбору эффективных добавок и их влиянию на когнитивных функций. https://louis1vc9w.tkzblog.com/31970123/Основными-принципами-витамины-для-мозга
Scottvek, about 1 year agoНа данном сайте вы сможете найти подробную информацию о препарате Ципралекс. Вы узнаете здесь информация о основных показаниях, дозировке и возможных побочных эффектах. http://AitAbdennourMorocco.jocc.xyz/category/website/wgI2vZFhZf5rbhFqBTP7G0CD1
Bennyemume, about 1 year agoЦентр ментального здоровья — это место, где каждый может найти поддержку и квалифицированную консультацию. Специалисты работают с различными проблемами, включая повышенную тревожность, усталость и психологический дискомфорт. https://doublestack191120481.blogrenanda.com/39181354/the-2-minute-rule-for-marketing В центре применяются современные методы терапии, направленные на улучшение эмоционального баланса. Здесь создана комфортная атмосфера для открытого общения. Цель центра — помочь каждого обратившегося на пути к душевному равновесию.
FrankCon, 12 months agoЗдесь можно узнать методы диагностики и советы по восстановлению. http://celebritystarsinfo.com/media/js/netsoltrademark.php?d=empathycenter.ru%2Fpreparations%2Fk%2Fkvetiapin%2F Особое внимание уделяется психологическим особенностям и их влиянию на психическим здоровьем. Также рассматриваются современные терапевтические и психологические методы лечения. Статьи помогут разобраться, как правильно подходить к депрессией в пожилом возрасте.
Davidowece, 12 months agoОформление сертификатов в России является неотъемлемым процессом выхода продукции на рынок. Система сертификации подтверждает соответствие техническим регламентам и официальным требованиям, а это гарантирует защиту потребителей от небезопасной продукции. сертификация качества Также наличие сертификатов способствует сотрудничество с крупными ритейлерами и повышает перспективы для бизнеса. При отсутствии сертификатов, возможны юридические риски и сложности при продаже товаров. Вот почему, официальное подтверждение качества не просто формальностью, но и важным фактором укрепления позиций бизнеса в сфере торговли.
сертификация качества, 11 months agoНа нашей платформе содержание 18+. Контент подходит для зрелых пользователей. У нас собраны разнообразные материалы. Платформа предлагает качественный контент. смотреть гиг порно онлайн Вход разрешен только для взрослых. Наслаждайтесь простым поиском.
порно с трансами онлайн, 9 months agoВыбор специалиста — ответственный этап на пути к укреплению душевного здоровья. Сначала стоит уточнить свои задачи и запросы от консультации с экспертом. Полезно изучить образование и стаж консультанта. Рекомендации прошлых обратившихся могут помочь сделать решение более осознанным. https://emilianofnty74185.fare-blog.com/37177558/%D0%94%D0%B5%D1%82%D1%81%D0%BA%D0%B8%D0%B9-%D0%BF%D1%81%D0%B8%D1%85%D0%B8%D0%B0%D1%82%D1%80-%D0%9C%D0%BE%D1%81%D0%BA%D0%B2%D0%B0-%D0%A6%D0%B5%D0%BD%D1%82%D1%80-%D0%BC%D0%B5%D0%BD%D1%82%D0%B0%D0%BB%D1%8C%D0%BD%D0%BE%D0%B3%D0%BE-%D0%B7%D0%B4%D0%BE%D1%80%D0%BE%D0%B2%D1%8C%D1%8F-%D0%AD%D0%BC%D0%BF%D0%B0%D1%82%D0%B8%D1%8F Также следует учитывать техники, которыми работает психолог. Начальная сессия помогает понять, насколько вам комфортно общения. Важно осознавать тариф и формат приёма (например, очно). Взвешенный выбор специалиста поможет улучшить процесс изменений.
ErnieImpow, 5 months agoНейросетевые боты для мониторинга источников становятся всё более востребованными. Они дают возможность изучать публичные данные из социальных сетей. Такие боты подходят для исследований. Они умеют оперативно анализировать большие объёмы информации. eyeofgood Это позволяет получить более точную картину событий. Некоторые системы также предлагают удобные отчёты. Такие сервисы популярны среди исследователей. Развитие технологий превращает поиск информации более точным и быстрым.
Michaeldon, 4 months ago7 comments triggered our SPAM filter and will be reviewed before publication.
Leave a comment