
The PiWatcher is a very small board that helps you fully shut down or reboot a Raspberry Pi, in case of an incident or simply for power saving purposes. You can even program your PiWatcher to shut down and automatically reboot your Pi a few minutes or hours later. In essence, the PiWatcher is a programmable watchdog circuit for the Raspberry Pi, usable with the humble Pi Zero up to the power-hungry Pi 3. The new version released in January 2020 also works with the Raspberry Pi 4.
It also now works with the Raspberry Pi 5 using recent firmware (e.g. dated 2025/11/27). Raspberry Pi 5 using older firmware may not work as expected due to a bug in the I2C implementation on the Pi 5.
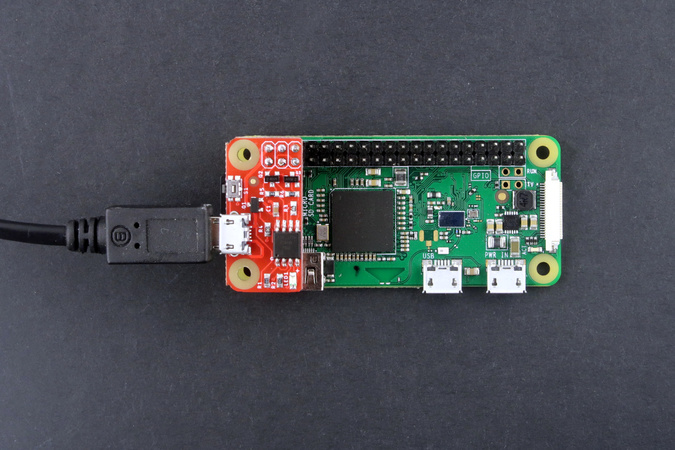
The board must be fitted on the first 6 pins of the Raspberry GPIO header and plugged into a micro USB power supply suitable for the Raspberry Pi in use. The board will then switch on or off the power provided to the Raspberry Pi based on instructions it receives through I2C. The board also features a miniature tact switch to allow manual control.
A solution for Raspberry Pi power management
The PiWatcher is designed to solve 2 problems with power management on the Raspberry Pi.
First, if you shut down a Raspberry Pi through software, for example by issuing a shutdown or halt command,
your Raspberry Pi will cease to operate, but it does not completely shut down. Instead, it enters a quiescent state
where it continues to eat 30 to 50mA, sometimes more depending on connected peripherals. This is wasteful and can
become an issue in battery-powered systems.
The PiWatcher can be programmed to fully cut power to the Raspberry Pi after a certain delay of inactivity. For
For example, you can tell the PiWatcher to cut power 10 seconds after a shutdown command has been issued, giving
the Raspberry Pi enough time to cleanly power off.
The second issue with power management has to do with the ability to recover from situations where a Raspberry Pi becomes stuck in an unrecoverable state. While in theory, this should not happen, a long-running Raspberry Pi can get 'stuck' or 'freeze', due to software or hardware failures or even environmental factors such as heat. In some cases the least unsatisfactory approach to deal with this issue is to simply switch off and on again the Raspberry Pi, enabling the application to continue and/or send out an alert.
The PiWatcher can be programmed to automatically power cycle a Raspberry Pi if it does not receive a 'heartbeat' from the device after a user-selectable delay. This can allow some critical applications to continue to operate without human intervention.
Furthermore, the PiWatcher can be programmed to "sleep" for a certain delay after a shutdown, ranging from a few seconds to about 36 hours, before rebooting your Raspberry Pi.
The table below summarizes the power consumption of a PiWatcher connected to a Raspberry Pi (measurements were done with a Pi Zero W).
| Situation | Current consumption |
|---|---|
| PiWatcher is running normally | 7mA in addition to the power consumption of the Raspberry Pi (typically >130mA). |
| PiWatcher is "sleeping" until reboot | 3mA |
| PiWatcher has fully shut down | >0.5mA |
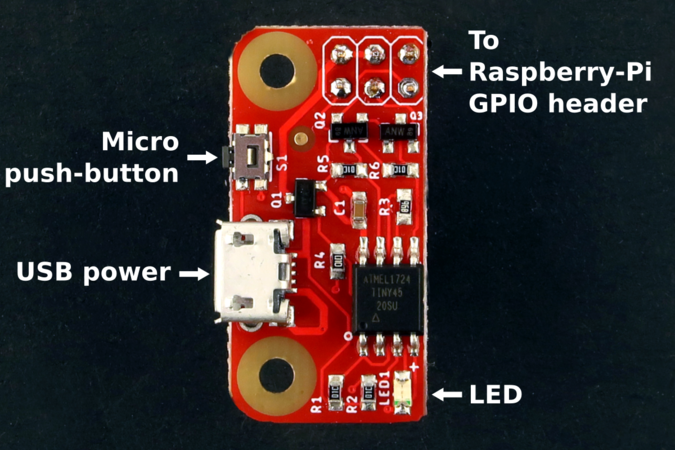
It has an LED and a button too!
The PiWatcher has an LED. When the Raspberry Pi is powered on, the LED is continuously on. When the Raspberry Pi is "sleeping" for a certain delay, the LED blinks slowly. When the Raspberry Pi is powered off, the LED remains off.
The PiWatcher also has a useful micro tact-switch:
- When your Raspberry Pi is running:
- a long press (5 seconds) on the button, followed by a button release, will completely power off the Raspberry Pi.
- a short press (half a second) on the button will send a software signal that can be exploited for user-defined purposes.
- When your Raspberry Pi is shut down, a short press on the button will restart the Raspberry Pi.
Alternative model with terminal blocks
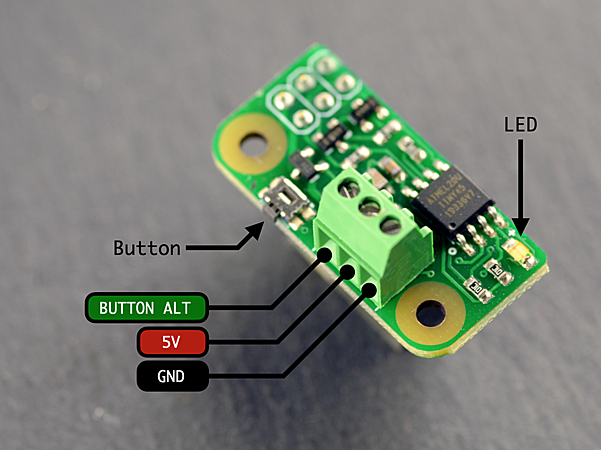
As an alternative to the classic PiWatcher described in this documentation, we have also released a special version called PiWatcher TB where the USB connector has been replaced with a 3-pin 2.54mm screw terminal block connector.
The PiWatcher TB depicted in the picture below offers 3 connections:
GND: power ground5V: 5V power sourceBUTTON_ALT: optionally connect this terminal andGNDto an external switch, which will act as an alternative to the on-board micro tact-switch.
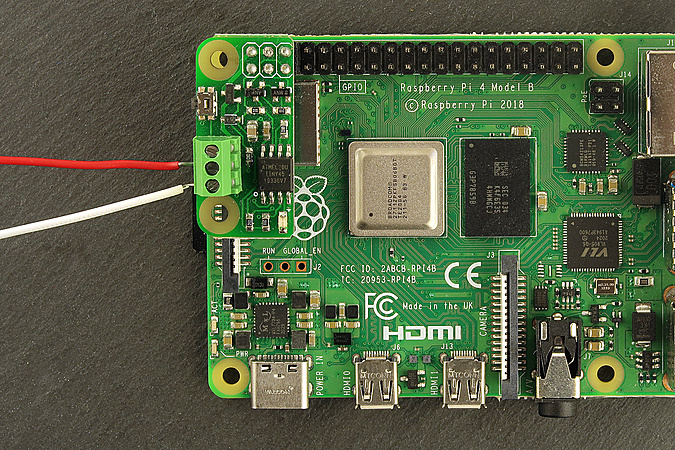
The picture below illustrates a PiWatcher TB fitted on top of a Raspberry-Pi: power is provided through 2 wires, 5V (red) and GND (white). The USB-C power connector of the Raspberry-Pi is not used.
Using the PiWatcher
Setup
To start using the PiWatcher, follow these steps.
Plug the PiWatcher in the first 6 pins of the Raspberry-Pi GPIO header. For greater mechanical stability it is recommended to secure the PiWatcher to the Pi with a standard 11mm standoff (2.5mm).
Next, plug the USB power supply into the PiWatcher. In turn, this will boot the Raspberry Pi.
To use the PiWatcher on the Raspberry Pi, you will need to enable I2C on the Raspberry Pi. Use sudo raspi-config for this
purpose (as described in this Adafruit tutorial for example).
First, download the piwatcher command line tool.
For 32-bit Raspberry Pi OS, you can download the tool as follows:
wget -N http://omzlo.com/downloads/piwatcher
For 64-bit Raspberry Pi OS, you can download the tool as follows:
wget -N http://omzlo.com/downloads/aarch64/piwatcher
Note: You can also compile the file yourself from source.
You'll need to make sure the file is executable and that it is located in a directory included in your PATH (e.g. /usr/local/bin on a Raspbian system).
chmod a+x piwatcher
sudo mv piwatcher /usr/local/bin/
The piwatcher tool can then be used to query and configure the PiWatcher.
Typing piwatcher status should return:
OK 0x00
On some systems, you may need to type sudo piwatcher status instead.
If you press the micro-switch on the PiWatcher and then re-run piwatcher status, you should see the following output:
OK 0x80 button_pressed
You can clear this button_press event, resetting the status of the PiWatcher by running piwatcher reset.
Re-running piwatcher status will show again status 0x00.
Setup on older Raspberry-Pi models
The PiWatcher works on most recent Raspberry Pi models. On older Raspberry-Pi models (e.g. The 2012 model B), you may encounter inconsistent behaviours with the piwatcher command because of I2C clock speed issues.
Some field reports suggest that this issue may also appear on some Raspberry Pi 4 models with incompatible 64-bit firmware.
To fix this problem, you will need to slow down the I2C clock from the default 100kHz to 50kHz, by editing the file /boot/config.txt and changing the following line:
dtparam=i2c_arm=on
to:
dtparam=i2c_arm=on,i2c_arm_baudrate=50000
After modifying the file, reboot your machine and you should be good to go.
Watchdog
We will now program the PiWatcher to shut off the Raspberry-Pi after 30 seconds if it does not receive any message from the Raspberry Pi, with the command piwatcher watch 30.
After this command has been issued, the PiWatcher will start a 30 second counter. If the counter reaches 0, the power to the Raspberry Pi will be cut off. However, this counter will be reset to 30 seconds each time the PiWatcher receives a 'read request' from the Raspberry Pi. A simple way to issue a 'read request' is to issue the command piwatcher status.
In this example, a simple way to keep the Raspberry-Pi form shutting down would be to run the following loop:
while true
do
   piwatcher status
   sleep 25
done
The sleep 25 assures that the PiWatcher is called approximately every 25 seconds, taking a 5-second safety margin from our 30-second deadline.
If this loop gets interrupted for any reason, the Raspberry-Pi will reboot after at most 30 seconds.
This feature can be exploited to completely shut off a RaspberryPi after a shutdown. Assuming the Pi takes at most 15 seconds to shut down, we can issue the following commands:
piwatcher watch 15
shutdown now
Automated rebooting
By default, the PiWatcher will shut off the Raspberry Pi until the user presses the button or until USB power is cycled.
We can program the PiWatcher to "wake" the Raspberry Pi after a certain delay (expressed in seconds).
To reboot the Raspberry-Pi 10 minutes after shutdown, we would simply type:
piwatcher wake 600
A clock under the hood
The PiWatcher is based on a Microchip attiny45 8-bit microcontroller, which runs with an 8Mhz internal oscillator.
An internal clock ticks about 25.04 times per second (8.000.000/(8192*39)). Watchdog and reboot time values are converted to internal clock ticks by multiplying their value by 25. Because of variations in temperature and voltage, the accuracy of these timings may be off by +/-10%.
You can view the actual value of the clock by issuing the command piwatcher ticks.
Running piwatcher automatically
In most cases, you don't want to type commands with piwatcher each time your Raspberry Pi boots up.
Instead, you will want to run PiWatcher automatically each time the Raspberry Pi boots up, with the correct configuration.
Fortunately, this is rather easy thanks to systemd.
As an example, we will consider the case where you want the Raspberry-Pi to fully shut down automatically after 30 seconds of inactivity, either because you've halted it or because it got 'stuck'.
For simplicity, we will assume you are running a recent version of Raspbian Linux and that you have installed the piwatcher binary in the directory /usr/local/bin/.
It takes 3 steps to implement our scenario.
STEP 1. Create a monitoring script
Use your favorite editor to create the file /home/pi/piwatcher.sh with the following content.
#!/bin/bash

/usr/local/bin/piwatcher watch 30

while true;
do
    /usr/local/bin/piwatcher status >> /dev/null
    sleep 15
done
This will essentially set a 30-second watchdog, and start an infinite loop that sends a message to the piwatcher every 15 seconds to assure that the watchdog is not triggered.
We need to make this script executable as follows.
chmod a+x /home/pi/piwatcher.sh
STEP 2: Create a new systemd service
Now we will create a systemd service for the previously created script. As we need 'root permission' to create the script, we will use sudo:
sudo vim /etc/systemd/system/piwatcher.service
You can replace vim with nano or your favorite editor in the line above.
The content of the file should look as follows.
[Unit]
Description=PiWatcher Service
StartLimitIntervalSec=0

[Service]
Type=simple
Restart=always
RestartSec=1
User=pi
ExecStart=/home/pi/piwatcher.sh

[Install]
WantedBy=multi-user.target
STEP 3: Activate and start the service
Finally, we will activate the service.
sudo systemctl enable piwatcher
This will typically output the following message: "Created symlink /etc/systemd/system/multi-user.target.wants/piwatcher.service → /etc/systemd/system/piwatcher.service."
We will also start the service, as follows.
sudo systemctl start piwatcher
The activation (and start) only needs to be performed once. The piwatcher will now be launched automatically each time the machine boots up.
Applying a default watchdog for extra security
What happens if your Raspberry-Pi halts or crashes before you get a chance to configure a watchdog timeout with the PiWatcher?
Most users will never have to worry about this risk. If you have created a systemd service as described above, this is uniquely to happen, but it's not completely impossible. To address this issue, we have added the ability to configure a set of default watchdog timeout and wakeup values that is stored in the EEPROM of the PiWatcher. You can configure this feature with the command piwatcher defaults <watchdog timeout> <wakeup timer>, replacing <watchdog timeout> and <wakeup timer> with the watchdog duration in seconds, and the wakeup delay in seconds, respectively.
For example, running the command piwatcher defaults 120 10, will store 120 seconds and 10 seconds in EEPROM as defaults for the watchdog timeout and reboot delay respectively. These values become active at the next restart. Running piwatcher defaults 0 0 disables this feature.
This command should be used with caution because you can lock yourself out, for example by selecting a watchdog timneout that is too short. There is a procedure to manually clear the EEPROM: simply hold the button on the PiWatcher down, then plug the USB power, while keeping the button pressed down for more than 10 seconds.
This features is only available in PiWatcher released after June 2021. To check if the firmware on your PiWatcher offers this feature, type piwatcher defaults to see if you get an error message or not.
I2C specification
The PiWatcher uses an extremely simple communication protocol based on I2C. The board essentially features an 8-byte register array that can you can read to or write from, at I2C address 0x62.
This register array is structured as follows:
| Register | Description |
|---|---|
| 0 | Status byte |
| 1 | Watchdog timeout in seconds, 0=disabled. |
| 2-3 | Wakeup delay in seconds divided by 2 (5 means 10 seconds). LSB first. 0=disabled. |
| 4-7 | Internal clock. LSB first. |
The status byte has the following structure:
| Position | Name | Description |
|---|---|---|
| Bit 7 | BUTTON_PRESSED | A 1 indicates that the PiWatcher button has been pressed. Writing a 1 will clear the bit. |
| Bit 6 | TIMER_BOOT | A 1 means that the PiWatcher rebooted the Pi after a wake-up period. Writing a 1 will clear the bit. This is unreliable however since the PiWatcher may have reset. |
| Bit 5 | BUTTON_BOOT | A 1 means that the PiWatcher rebooted the Pi because the user pressed the button. Writing a 1 will clear the bit. This is unreliable however since the PiWatcher may have reset. |
| Bit 4-0 | unused |
The command ./piwatcher dump will print the raw content of all registers.
The content of the registers can be manipulated with i2c-tools as well (see instructions here for example). For example, you can get the status byte with the command i2cget -y 1 0x62 0.
Resources
- Buy a PiWatcher from our store or from Lectronz.
- Schematics.
- Source code of PiWatcher command line utility.
- Source code of PiWatcher Attiny45 firmware.
- Troubleshooting guide
Comments
Hi Omzlo,
Got my PiWatcher soldered and installed, confirmed it works. I intend to use the PiWatcher to power down a Raspberry Pi Model 3 B that I'm using as an OctoPrint host for my 3D printer, when I select system shutdown from OctoPrint.
Although I'm a software developer with some Linux experience, I'm a Raspberry Pi novice, so I'm a bit lost as to how/where to save and configure the watchdog script! - can you provide a more complete example, i.e. where to save the script on the Pi so it runs on startup, etc., or point me to online resources/help/tutorial?
Thanks Philip
Philip Steiner, about 7 years ago@Philip: We added a section to address your question: https://www.omzlo.com/articles/the-piwatcher#running-piwatcher-automatically
Omzlo, about 7 years agoBrilliant! Script & piwatcher service works just like it says on the tin. Thanks so much for the detailed instructions!
Regards, Philip
Philip Steiner, about 7 years agoThree days delivery from Grece to Belgium! Just fantastic. Let's try it now. Marc
Marc, about 7 years agoHi Omzlo,
I ordered the PiWatcher and have tested it works as you described. It looks very much like the right product to solve my problem. (The problem is that I have a 1-Wire network where the sensors occasionally [sort of once per 45 days] disappears from the network, and the only way of getting them back is to power cycle the whole rPI).
A question: My 1-Wire network master is a full size expansion board to the rPI (Abiowire: https://www.axiris.eu/en/index.php/1-wire/abiowire).
Now, the AbioWire card does not "continue" the 40 expansion pins of the rPI, so I cannot put PiWatcher on top of it. And if I put the PiWatcher under it... then PiWatcher uses only 3 of the 40 pins... and I have no pins to connect the AbioWire to.
How to solve?
The more general form of the question is how to connect multiple expansion boards to the 40 pin expansion bus. In the case with PiWatcher it is slightly different, since it only uses 2x3=6 pins on one side.
Thanks for quite a useful product. Arne S.
Arne Steinarson, about 7 years agoHi, Does the PiWatcher fit the Raspberry Pi 4? There could be two issues: 1. heatsink (integrated in case?) on CPU may get in the way. 2. Raspberry Pi 4 current consumption may be too high for the PiWatcher switches (those tiny MOSFETs) ...
I wonder ....
Arjen Raateland, almost 7 years agoIs PiWatcher with CE marking? kind regards
massimo, almost 7 years ago@Arjen Raateland: We have tested the PiWatcher on the Raspberry Pi 4, running for several days without any issue, but we never used a heatsink. We also did some CPU stress tests, to boost current consumption and again it all worked fine. The Mosfet, which is rated up to 5A, warms just a little. However, we would not recommend pushing the current consumption above 2A, by avoiding to plug too many external peripherals.
Edit: The PiWatcher is not recommended for the Raspberry Pi 4, as it may not perform as expected.
Omzlo, almost 7 years ago@massimo: the PiWatcher is not currently with CE marking.
Omzlo, almost 7 years agoWill this unit work with the pi 1B. Have several of these older units providing remote access to radio recievers. The basic ups installed does a good job of handling momentary power outages which are common but i need something to shut them down safely during longer outages.
Thanks
Keith, almost 7 years agoRee Pi 4. Do you plan to release a version that will work with the Pi 4?
Scott Butler, almost 7 years ago@Scott Butler: Yes, we have a working prototype that is compatible with the Pi 4.
omzlo, almost 7 years agoWhat's the longest wake interval ?
Ian Boag, almost 7 years agoHello
I have a question, I want to order a product from your webshop. but i can not find it anymore on your site, it looks like this picture on this site http://bit.ly/snowborditems343 Mail me if you are going to sell it again. I'll wait.
Sincerely
"Sent from my iPhone"
Hector Tompson, over 6 years agoHi Omzlo, we try to buy others PiWatcher but link to your shop seems not working and PiWatcher on Tindie are out of stock. What the situation? Kind regards.
Massimo Nannizzi, over 6 years ago@Massimo: We are currently out of stock. We expect to have new stock in two weeks.
omzlo, over 6 years agoHi, Purchased a few piWatchers, all my pis have these oled screens wired up to display status in a rack. Any tips as to whether I can use the piWatcher alongside the oled screens?
https://www.amazon.co.uk/gp/product/B07BY6QN7Q/ref=ppxyodtbsearchasintitle?ie=UTF8&psc=1
Thanks!
Dan, over 6 years agoThe piwatcher page in the store says it works with RPi4. This page says it does not. Which is it?
Michae, over 6 years ago@Michae: Thanks for catching that. The new version we released in January 2020 works with the Pi4. The previous one didn't.
omzlo, over 6 years agoMechanical engineer here, can you provide length, width, and height of the board, as well as dimensions for the included header?
Catherine, over 6 years agoDear Sir,
I ordered couple of piwatcher. I installed at Raspberry PI 4. After I executed piwatcher wake and piwatcher watch, the piwatcher dump command always show zero for all bits.
Is there any clue for this ?
dwi kristianto, over 6 years agoHi. Is it possible to schedule it for turning Pi (cm3+ with board with UPS HAT) on after it was turned off by out of battery condition? I have Rpi with dumb UPS (it just provide power and has a power button and that is it - no possible to turn off rpi in case of batteries out energy, 52pi old model UPS EP-0114) and when there is no external power for some time it just cuts power. To turn it on power button should been pressed.
Thanks for your time!
Alex, about 6 years ago1 thing that tripped me up when I first got a piwatcher was I would get
Failed to open i2c device 1
ERR
when running piwatcher status. I do not use the pi default user in my builds so I have to use sudo a lot more. Using sudo piwatcher status I get the correct "OK 0x00"
GeekDom, about 6 years agoHi, does the piwatcher script has a test feature via CLI?. Would like to simulate a hardware lockup to see if it is actually working before i deploy these all over.
Thanks
Phil, about 6 years agoWas the USB module updated on the new version or it's still micro usb?
Salman, about 6 years ago@Phil: No the PiWatcher does not have a test feature, though that's certainly a good idea to add in the next version.
Omzlo, about 6 years ago@Salman: It's USB micro still. USB-C will likely come in the next version.
Omzlo, about 6 years agoThe piwatcher covers pins 1-6. Do the headers allow for expansion so that you can use the power/SDA/SCL pins for your projects? I can't figure this out by looking at the pictures ;-)
Onno, about 6 years agoHi, happy customer here, using a PiWatcher to control power on a Raspberry Pi 3 Model B+ running as an Octoprint server. I plan to set up another Octoprint server, this time using a Raspberry Pi 3 Model A+. It appears to have the same pinouts as the Model B+ and Zero, so do you think PiWatcher will work on the A+? Thanks again!
Philip Steiner, about 6 years agoJust got my order of 2 of the new version piwatchers. Working perfectly! Thanks for such a great product.
Don, almost 6 years agoWow! Excellent, "five star" product for my needs (having some Raspberry Pis running unattended at my home automation system days and nights...) and very good documentation + instructions. So cheap, too :-) I'm very pleased about Your good documentation and guide practice; it definetively plays in a big role when purchasing Raspberry (or Arduino) products. I had absolutely no problems to get PiWatcher up and running :-)
The instruction section "how-to-run-piwatcher-automatically" section is very good, since it is also a good starting point for someone wanting to learn more about the subject when this kind of behaviour is needed with other programs (it's very typical need at unattended systems and systemd is the best choice for the job at Linux based systems).
May I suggest one thing: Could You consider to provide 2 extra holes on the board (next revision?) to make it easier to add an extra button further from the board to replace the function of the micro one?
Yrjö Seppä, almost 6 years agoWill this unit work with modification on the pi 1 boards?
Ben, over 5 years agoThe command line looks great for the setup of the device. As it appears to be just an I2C interface... One assumes the heartbeat is just a command on the I2C channel that the hardware is monitoring... Is there any python sample that could be used as a demonstration on how this could work. I have no issues with setting it up via command line in a batch at startup - but I would love to send the heartbeat from my python code to ensure that has not hung...
Keith, over 5 years agoI already have something plugged in to the GPIO connector on my Pi 4. I'd love to use the PiWatcher as well. Is it likely to work with a GPIO splitter board? (for example there is one available from cyntech.co.uk)
Nick Rozanski, over 5 years agoI already have another 3V3 device on a Pi Zero SCL/SDA lines. Has anyone found this acceptable to the PiWatcher as long as you keep to the Pi side?
DAVID WHITELEY, over 5 years agoMy Piwatcher is not working right in a way that the Test 4 (Wake up Test ist not Working) Everything else, is working properly.
Wilhelm, over 5 years agoSame issue as above - piwatcher is not waking up my pi after a shutdown
Joe, over 5 years ago@Wilhelm, @Joe: please contact support@omzlo.com and describe precisely your setup (raspberry pi model, peripherals, etc.) so that we can best assist you.
Omzlo, over 5 years agoI have a rpi4 2gb. Installed the new piWatcher TB and I get the green led when I power on the pi. I installed piwatcher command line tool per instructions and when I check status I get "OK 0x00".
I attempted to run the following test per instructions: piwatcher watch 15 shutdown now
Pi shutdown to sleep mode as usual but piwatcher never killed the power. What am I missing?
Troy, about 5 years ago@troy: please contact support@omzlo.com and describe precisely your setup (raspberry pi model, peripherals, etc.) so that we can best assist you.
Omzlo, about 5 years agoHi, I was wondering how exactly the programmed shutdown and reboot worked as far as scheduling. I could schedule it to shutdown at the end of each day then boot back up at the start of the next day?
Thanks!
gw, about 5 years agoSaves me a lot of time manual power cycling my test nodes after messing up configurations. Using it on Pi 1-3 without problems.
@Ben works fine on Pi 1. All steps necessary for configuration can be found in my install script: https://github.com/kwitsch/piwatchdog
Kwitsch, about 5 years agoI'm wanting to set up a mechanism for an off-grid Pi (solar+camera+4G) that starts at (say) 8am, takes a pic, sends it via 4G, then shuts down for 1 hour. Repeats until 8pm, then shuts down for the night. Looking at the watcher, am I correct in saying there's no RTC and I'd need to add an RTC to the PI to do this? Thanks.
Gerard, about 5 years agoHello, I am interested in buying a piwatcher for a PI 4, does it have a usb-c connector?
francisco, about 5 years agoI installed the Piwatcher on a Pi Zero W which runs an internet-connected greenhouse. My problem was that the Pi would sometimes hang up at unexplained times. I am unsure if this is due to high temperature, or voltage fluctuations - the whole system runs off a 12V lead acid battery which is charged by a solar panel. Anyhow, installation of the Piwatcher was straightforward, and it all works as expected. I have set a watch period of 120s, and a wake period of 15s. All test procedures work as expected - eg disable the regular status call, and the pi reboots. BUT, the system still hangs up at random times, and does not reboot when it hangs. I have now added a small processor fan, which does a good job of cooling the Pi's CPU, never allowing the temperature to go above 45deg C, so I don't think overheating can be the issue. Any suggestions for debugging the Piwatcher?
Stuart Baker, about 5 years agoHi all, anyone with a link to either the executable or the source to compile?Main site gives security errors and wont let downloads...
Manos, over 4 years agoHi all, anyone with a link to either the executable or the source to compile?Main site gives security errors and wont let downloads...
Manos, over 4 years agoI am using the PiWatcher with OSMC and a Rpi 3. I have the one with a remote push button. When I get to the point in the instructions to type "piwatcher status" I get the following:
osmc@10canodom:~$ piwatcher status Failed to open i2c device 1 ERR osmc@10canodom:~$
I have tried enabling i2c, but I cannot find clear instructions for osmc. While the pi does not power down when I click power down in osmc/Kodie, it does reboot when I press the remote button.
Lynn Odom, over 4 years agoI am using the PiWatcher with OSMC and a Rpi 3. I have the one with a remote push button. When I get to the point in the instructions to type "piwatcher status" I get the following:
osmc@10canodom:~$ piwatcher status Failed to open i2c device 1 ERR osmc@10canodom:~$
I have tried enabling i2c, but I cannot find clear instructions for osmc. While the pi does not power down when I click power down in osmc/Kodie, it does reboot when I press the remote button.
Lynn Odom, over 4 years agoLoving the PiWatcher!
I have a noob code question -- Is there a way to write a script along the lines of:
if [ buttonpressed = true ] do [ run shell script ] else do [ nothing ]
And if this is possible, how and where would it go? Python? Shell? Any help would be much appreciated!
psb, over 4 years agoLoving the PiWatcher!
I have a noob code question -- Is there a way to write a script along the lines of:
if [ buttonpressed = true ] do [ run shell script ] else do [ nothing ]
And if this is possible, how and where would it go? Python? Shell? Any help would be much appreciated!
psb, over 4 years agoGuess the exchange rate, bitcoin and get money. Start with $10 and you can earn up to $1000 in a day, see how Here
Duane, over 3 years agoGuess the exchange rate, bitcoin and get money. Start with $10 and you can earn up to $1000 in a day, see how Here
Duane, over 3 years agoGuess the exchange rate, bitcoin and get money. Start with $10 and you can earn up to $1000 in a day, see how Here
Duane, over 3 years agoGuess the exchange rate, bitcoin and get money. Start with $10 and you can earn up to $1000 in a day, see how Here
Duane, over 3 years agoSports betting. Bonus to the first deposit up to 500 euros. Online Casino. sports betting
Cornell, over 3 years agoSports betting. Bonus to the first deposit up to 500 euros. Online Casino. sports betting
Cornell, over 3 years agoGuess the exchange rate, bitcoin and get money. Start with $10 and you can earn up to $1000 in a day, see how Here
Ricardo, over 3 years agoI plan on using this in a car environment with Mopidy. Is there any way for me to have it turn off when it no longer has power, but then turn on normally when it does? Or am I just reading this wrong, and this is what it does by default...?
Ashton, over 3 years agoI plan on using this in a car environment with Mopidy. Is there any way for me to have it turn off when it no longer has power, but then turn on normally when it does? Or am I just reading this wrong, and this is what it does by default...?
Ashton, over 3 years agoHi, I want to program the piwatcher to shutdown the pi using the user programable button press. I'm having trouble writing the shell script for this. Has anyone done this before and would you be able to provide me an example? Thanks
Lloyd, over 3 years agoJust got this PiWahtcher. I have another 40-pin connector on top of RPI, so would need to cable manually, and have questions - do I need to do it for all 5 pins (as 1&2 both are 5 Volts) - since RPI pins provide 3.3 and 5 voltages, where do you need USB-C cable for? I see it's used to power cycle RPI, but I would need it only as watchdog to reboot RPI if stuck, or I just need to plug it to power in order PiWatcher to work?
Ismo Öhman, over 1 year agoJust got this PiWahtcher. I have another 40-pin connector on top of RPI, so would need to cable manually, and have questions - do I need to do it for all 5 pins (as 1&2 both are 5 Volts) - since RPI pins provide 3.3 and 5 voltages, where do you need USB-C cable for? I see it's used to power cycle RPI, but I would need it only as watchdog to reboot RPI if stuck, or I just need to plug it to power in order PiWatcher to work?
Ismo Öhman, over 1 year agoJust got this PiWahtcher. I have another 40-pin connector on top of RPI, so would need to cable manually, and have questions - do I need to do it for all 5 pins (as 1&2 both are 5 Volts) - since RPI pins provide 3.3 and 5 voltages, where do you need USB-C cable for? I see it's used to power cycle RPI, but I would need it only as watchdog to reboot RPI if stuck, or I just need to plug it to power in order PiWatcher to work?
Ismo, over 1 year agoJust got this PiWahtcher. I have another 40-pin connector on top of RPI, so would need to cable manually, and have questions - do I need to do it for all 5 pins (as 1&2 both are 5 Volts) - since RPI pins provide 3.3 and 5 voltages, where do you need USB-C cable for? I see it's used to power cycle RPI, but I would need it only as watchdog to reboot RPI if stuck, or I just need to plug it to power in order PiWatcher to work?
ismo, over 1 year agoI got myself 2nd HW of PiWatcher (free, as 1st unit did not work), and noticed while testing it, that it performs shutdown as expected, but wakeup does never happen.
If I set wake up: piwatcher wake 600 OK
but when I query it it always shows this: piwatcher wake OK 66136
So I count this to be 18+ hours!! It does not matter whatever value I try to set there...
Ismo Öhman, 8 months agoI got myself 2nd HW of PiWatcher (free, as 1st unit did not work), and noticed while testing it, that it performs shutdown as expected, but wakeup does never happen.
If I set wake up: piwatcher wake 600 OK
but when I query it it always shows this: piwatcher wake OK 66136
So I count this to be 18+ hours!! It does not matter whatever value I try to set there...
Ismo, 8 months agoI got myself 2nd HW of PiWatcher (free, as 1st unit did not work), and noticed while testing it, that it performs shutdown as expected, but wakeup does never happen.
If I set wake up: piwatcher wake 600 OK
but when I query it it always shows this: piwatcher wake OK 66136
So I count this to be 18+ hours!! It does not matter whatever value I try to set there.
Ismo, 8 months agoLeave a comment