
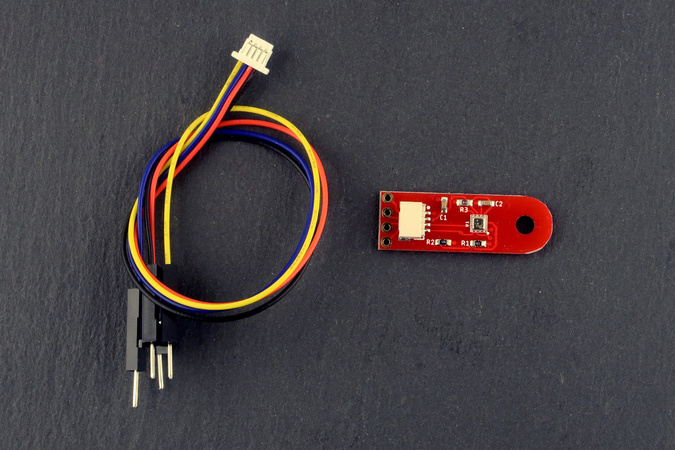
The BME280 I2C/Qwiic atmospheric sensor breakout features a genuine Bosch BME280 configured as a 3.3V I2C device. It allows measuring temperature, humidity, and pressure and works out of the box with existing BME280 Arduino libraries.
The breakout can be connected with I2C through two options:
- With an I2C Qwiic connector (JST SH), and
- With a classic 4 pin 2.54mm pitch header (0.1"),
The board works with voltages between 1.8V and 3.6V, and is compatible with all modern 3.3V Arduino-compatible boards (e.g. MKR, Feather, Teensy, CANZERO, etc.). It does not feature a 5V level shifter and will not work with legacy Arduino 5V boards such as the UNO.
This breakout is tiny, measuring 10mm x 30mm (0.4" x 1.18"), and features an M3 mounting hole. We made it very small so we could embed it in the smallest places.
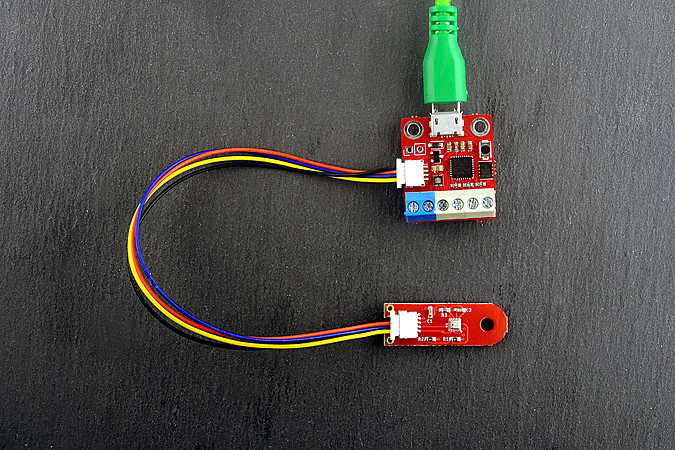
The BME280 I2C/Qwiic atmospheric sensor breakout can be connected to any qwiic-compatible or STEMMA QT-compatible device.
This article discusses how to connect this sensor break-out to a Raspberry-Pi or a Circuit-python compatible micro-controller such as the FIDI.
Connecting the sensor to a Raspberry-Pi
There are many ways to connect an qwiic-compatible I2C device to Raspberry-Pi, such as the Sparkfun Qwiic HAT or simply a JST to Qwiic adaptor.
The BME280 uses I2C to communicate with the Raspberry Pi. If I2C is not enabled yet, you can enable it by:
- Running
sudo raspi-config - Select Interfacing Options
- Select I2C
- Select YES
While not strictly requires, the i2c-tools package provides a good way to quickly test I2C devices on the Raspberry Pi. You can install it with:
sudo apt-get install i2c-tools
If your BME280 I2C/Qwiic atmospheric sensor breakout is connected to your Raspberry-Pi, running i2cdetect -y 1 should display information similar to this example:
     0  1  2  3  4  5  6  7  8  9  a  b  c  d  e  f
00:          -- -- -- -- -- -- -- -- -- -- -- -- --
10: -- -- -- -- -- -- -- -- -- -- -- -- -- -- -- --
20: -- -- -- -- -- -- -- -- -- -- -- -- -- -- -- --
30: -- -- -- -- -- -- -- -- -- -- -- -- -- -- -- --
40: -- -- -- -- -- -- -- -- -- -- -- -- -- -- -- --
50: -- -- -- -- -- -- -- -- -- -- -- -- -- -- -- --
60: -- -- -- -- -- -- -- -- -- -- -- -- -- -- -- --
70: -- -- -- -- -- -- -- 77
The value 77 on the last line indicates that an I2C device with address 0x77 is available on the I2C bus of the Raspberry Pi. The BME280 has two possible I2C addresses: 0x76 and 0x77. Our BME280 breakout board is configured to use address 0x77, but this can be changed to 0x76 through a solder jumper on the board.
The easiest way to communicate with a BME280 sensor is to use some of the many available python libraries designed to communicate with the sensor. As an example, we will use the BME280 library created by Pimoroni. Similar libraries are provided by Adafruit, Sparkfun and many others.
The following two commands will download the required packages and library needed for the BME280 sensor.
sudo apt-get install python-pip python-smbus
sudo pip install pimoroni-bme280
Next, we can test our BME280 sensor with the following python script:
#!/usr/bin/env python

import time
try:
    from smbus2 import SMBus
except ImportError:
    from smbus import SMBus
from bme280 import BME280

print("""all-values.py - Read temperature, pressure, and humidity
Press Ctrl+C to exit!
""")

# Initialise the BME280
bus = SMBus(1)
bme280 = BME280(i2c_dev=bus, i2c_addr=0x77)

while True:
    temperature = bme280.get_temperature()
    pressure = bme280.get_pressure()
    humidity = bme280.get_humidity()
    print('{:05.2f}*C {:05.2f}hPa {:05.2f}%'.format(temperature, pressure, humidity))
    time.sleep(1)
This is essentially the default demonstration script provided by Pimoroni with a small change to specify that the I2C address of the board is 0x77 instead of the default address 0x76 (see bme280 = BME280(i2c_dev=bus, i2c_addr=0x77)).
Assuming we saved the above script in a file named "bme280-test.py", we can run it with python bme280-test.py and it should provide an output similar to the following:
all-values.py - Read temperature, pressure, and humidity
Press Ctrl+C to exit!

22.54*C 678.71hPa 85.95%
25.40*C 972.42hPa 53.49%
25.41*C 972.43hPa 53.45%
25.42*C 972.44hPa 53.43%
25.42*C 972.45hPa 53.44%
...
Connecting the sensor to a Circuitpython board
Connecting the BME280 atmospheric sensor breakout to a Circuitpython-compatible board is relatively easy. As an example, we will examine how to connect it to our FIDI board, but almost all these explanation can be transposed to any other Circuitpython board.
By default, most CircuitPython boards like FIDI don't come with drivers for specific sensors like the BME280. We could take the BME280 datasheet and write I2C code in Python to fetch data from the sensor. But we don't need to do that: Adafruit provides a bundle of libraries for MicroPython that contains a ton of drivers and code to interface with electronics, including the BME280.
Once we get the bundle and unzip it, we need need to do the following:
- Create a
libdirectory on the CIRCUITPY flash drive if it does not exist. - Copy
adafruit_bme280.mpyandadafruit_bus_deviceinto thelibdirectory.
Now we can retrieve data from the sensor with the following code:
import board
import time
import adafruit_bme280

i2c = board.I2C()
bme280 = adafruit_bme280.Adafruit_BME280_I2C(i2c)

while True:
    print("\n")
    print("Temperature: %0.1f C" % bme280.temperature)
    print("Humidity: %0.1f %%" % bme280.humidity)
    print("Pressure: %0.1f hPa" % bme280.pressure)
    time.sleep(2)
Again, the output of this program is visible on the serial terminal, showing temperature, humidity, and pressure.
Adafruit's bundle of libraries for MicroPython is a great resource for quick prototyping.
Comments
8 comments triggered our SPAM filter and will be reviewed before publication.
Leave a comment