
NoCAN is a 'wired' IoT platform for makers, that enables to connect Arduino compatible nodes in a network controlled by a Raspberry Pi. The supporting software enables you to connect your NoCAN network to the outside world. It is notably possible to control your NoCAN application with a smartphone with the blynk plaform. This article discusses the experimental support for MQTT that was recently added to NoCAN.
MQTT is very similar to the NoCAN network protocol that runs on CAN bus. Both protocols use the concept of publish/subscribe. Whereas NoCAN publishes data to 'channels', MQTT uses the concept of 'topics' essentially the same way. MQTT is generally more featureful, offering choices in quality of service (QoS) that are not available with NoCAN. Because MQTT is a well-defined standard, there are many tools and online services that offer an MQTT service.
Principle
The nocanc tool provided in NoCAN now allows you connect to an MQTT broker and to translate messages sent on a NoCAN channel into publications to an MQTT topic.
Reciprocally, nocanc can also subscribe to MQTT topics and translate any incoming MQTT publication into a publication to a NoCAN channel.
Finally, the tool can also optionally apply transformations to the data as it gets transferred from MQTT to NoCAN or from NoCAN to MQTT.
Running the MQTT gateway is very similar to running the 'blynk' gateway: simply run nocanc mqtt [options].
Note: make sure you have downloaded the latest version of nocanc to test MQTT.
Rather than using the command line, it is recommended to put the options in the nocanc configuration file as our tutorial.
Connecting to an MQTT broker can be as simple as typing:
nocanc mqtt --mqtt-server='mqtt://example.com`
In most cases, you'll be required to provide a username and password, which is done by modifying the URL:
nocanc mqtt --mqtt-server='mqtt://username:password@example.com`
You can also specify an MQTT client id if necessary:
nocanc mqtt --mqtt-server='mqtt://username:password@example.com` --client-id='mydevice'
Now assume you want to forward all data published on NoCAN channel 'apples' to the MQTT topic 'oranges', you'll run:
nocanc mqtt --mqtt-server='mqtt://example.com` --publishers="apples::oranges"
Similarly, if you want to subscribe to the MQTT topic 'bananas' and forward its content to the NoCAN channel 'peaches', you'll run:
nocanc mqtt --mqtt-server='mqtt://example.com` --subscribers="bananas::peaches"
Finally, you can apply simple transformations to the data using Google Go text templating. For example let's assume that you have a NoCAN channel called 'temp' that provides temperature data, which you want to forward to an MQTT topic called 'home/temperature', and you need to append the letter 'C' to the temperature to indicate the use of Celcius degrees as opposed to 'F' for 'Fahrenheit'.
You can achieve this with the following expression:
nocanc mqtt --mqtt-server='mqtt://example.com` --publishers='temp:{{ print "%sC" .Value }}:home/temperature'
It is recommended to store options in the nocanc.conf configuration file, which might look like this:
event-server = "raspberrypi:4242"
auth-token = "nocan-password"

[mqtt]
mqtt-server="mqtt://foobar:secret@example.com"

[[mqtt.publishers]]
channel="temp"
topic="home/temperature"
transform='{{ printf "%sC" .Value }}'
Of course, you can have more than one 'publisher' (or 'subscriber') entry in your configuration file by simply adding more entries:
# first entry
[[mqtt.publishers]]
channel="temp"
topic="home/temperature"
transform='{{ printf "%sC" .Value }}'

# second entry
[[mqtt.publishers]]
channel="humidity"
topic="home/humidity"
transform='{{ printf "%s%%" .Value }}'
The following paragraphs will illustrate some examples of MQTT IoT services that can be used with NoCAN.
Example 1: using adafruit.io
Adafruit offers a very accessible platform for IoT data management: adafruit.io. And best of all, it features a really easy to use MQTT API. You can try the platform for free, so this a perfect way to test our NoCAN to MQTT gateway.
Adafruit.io structures data into 'feeds' and 'dashboards'. As a starting point, we recommend looking at nicely written documentation describing the Adafruit MQTT API: we will not repeat it here.
As an example, we will assume the following scenario:
- Your NoCAN network has a node publishing temperature data on a channel named 'bme280/temperature'
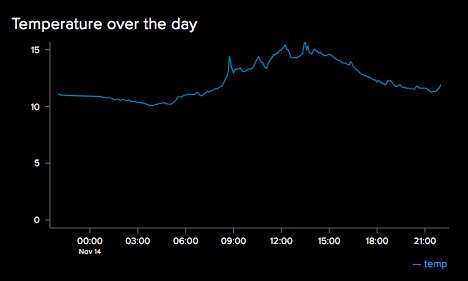
- You want to display a graph showing temperature data over 24 hours on an Adafruit.io 'dashboard'.
- You have an Adafruit account set up with username 'foobar'.
To get an example of a CANZERO node publishing temperature data, please look at our previous blog post on the topic. That example uses a BME280 sensor, but any temperature sensor would do the trick with some adaptation to the code.
The first thing to do is to log into Adafruit IO and create a 'feed' for the temperature data: just click on 'feeds', and next in the action menu select 'create a new feed'. We will give that field the name 'temp'. Next, we will add that field to a 'dashboard'. Following a similar procedure as we did for the 'temp feed, just click on 'dashboards', and next in the action menu select 'create a new dashboard'. In the new dashboard, click on the blue '+' (plus sign) icon to add a new block. Select the 'line chart' which is represented by the icon shown below. In the following configuration menu, select the 'temp' feed as a source of data.

As a final step, you need to retrieve your AIO key. Simply click on 'View AIO Key' and then note the value of the 'Active Key'.
At this point, you are all set on the Adafruit side!
On the NoCAN side, you should edit your nocan.conf file to look like this:
event-server = "raspberrypi:4242"
auth-token = "nocan-password"

[mqtt]
mqtt-server="mqtt://foobar:0123456789abcdef01234567891bcdef@io.adafruit.com"

[[mqtt.publishers]]
channel="bme280/temperature"
topic="foobar/feeds/temp"
Of course, you need to adapt the example to your setup.
- The values of
event-severandauth-tokenwill depend on the configuration of yournocandserver. - In
mqtt-server, you should replacefoobarwith your own Adafruit username, and the AIO key0123456789abcdef01234567891bcdefwith your own key. - In
topic,foobarshould again be replaced by your Adafruit username.
Then it's time to fire up nocanc mqtt and watch data get plotted on the Adafruit IO dashbaord.
Example 2: Cayenne
MyDevices.com offers a service called Cayenne, which is similar to Adafruit IO, though perhaps less intuitive. Likewise, it's free.
Like in the previous example, we will assume that we have a NoCAN network has a node publishing temperature data on a channel named 'bme280/temperature' that we want to translate to a MQTT topic, which will be forwarded and published in Cayenne.
Once you create an account on Cayenne, the interface will propose to use a new device, and will provide you with:
- username: An MQTT Username (e.g. abababab-1234-l337-abcd-dcba76543210)
- password: An MQTT Password (e.g. 0123456789abcdef01234567891bcdef01234567)
- client-id: An MQTT Client Id (e.g. cdcdcdcd-1234-1234-1234-fedcbafedcba)
You will need this data in 3 distinct places.
First, you will need this data to define the MQTT URL for nocanc with the following format:
mqtt://<username>:<password>@mqtt.mydevices.com
Second, you will also need to specify an explicit MQTT client-id in the same configuration file.
Finally, the MQTT topic where you forward the must have the following structure:
v1/<username>/things/<client-id>/data/<channel-id>
For simplicity we will take channel-id = 0.
Putting all the pieces together and using the example values above, we get the following configuration file:
event-server = "raspberrypi:4242"
auth-token = "nocan-password"

[mqtt]
client-id="cdcdcdcd-1234-1234-1234-fedcbafedcba"
mqtt-server="mqtt://abababab-1234-l337-abcd-dcba76543210:0123456789abcdef01234567891bcdef01234567@mqtt.mydevices.com"

[[mqtt.publishers]]
channel="bme280/temperature"
topic="v1/abababab-1234-l337-abcd-dcba76543210/things/cdcdcdcd-1234-1234-1234-fedcbafedcba/data/0"
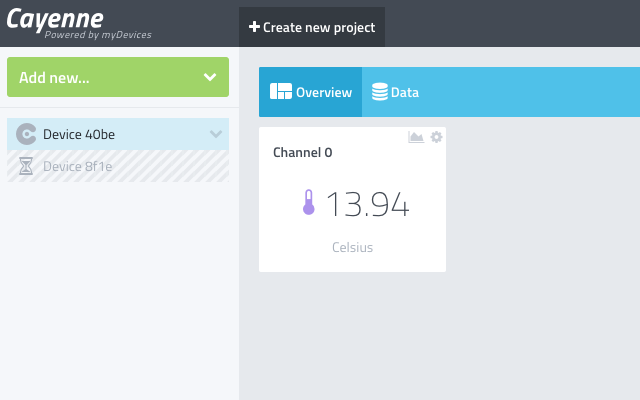
Launching nocanc mqtt should start the data flow. The Cayenne dashboard will indicate that a device is connected.
However, this is not quite enough to get a nice result. We need to tell Cayenne that we want to display temperature data,
and in our case, in Celcius unit (the same would apply for Fahrenheit).
To achieve this, the MQTT payload on the topic we created should have the following format: temp,c=<value> where value is the actual numeric temperature. One possible solution is to modify the Arduino sketch of the CANZERO node to produce the correct format. So instead of publishing the value "20" to indicate a measured temperature of 20 degrees Celcius, the sketch should produce the string "temp,c=20".
Making such a change may not always be convenient, nor practical.
So we will look at another feature of the nocanc MQTT gateway: transformations.
As we already note, you can transform data as it flows between a NoCAN network and an MQTT broker (and vice-versa), thanks to the use of Google Go text templating.
To achieve the transformation we want, we would add an extra line in the nocanc.conf file, as follows:
event-server = "raspberrypi:4242"
auth-token = "nocan-password"

[mqtt]
client-id="cdcdcdcd-1234-1234-1234-fedcbafedcba"
mqtt-server="mqtt://abababab-1234-l337-abcd-dcba76543210:0123456789abcdef01234567891bcdef01234567@mqtt.mydevices.com"

[[mqtt.publishers]]
channel="bme280/temperature"
topic="v1/abababab-1234-l337-abcd-dcba76543210/things/cdcdcdcd-1234-1234-1234-fedcbafedcba/data/0"
transform='{{ printf "temp,c=%s" .Value }}'
Once the transform is in place, Cayenne will automatically show the data with the correct units on the dashboard. An extra click gives access to details and charts.
Conclusions
There are plenty of other ways to play with MQTT. In 2017, Hackaday provided a nice overview of available solutions for MQTT data logging.
Another alternative is to simply set up your own MQTT broker.
With an open-source tool like mosquitto MQTT, you can even run it almost anywhere.
On a Raspberry Pi, just type sudo apt-get install mosquitto mosquitto-clients and you are good to go!
For programmers, the python bindings for mosquitto MQTT open even more possibilities.
A final note of caution: this very first release of a MQTT gateway for nocanc may have have bugs. Help us catch them!