Go to:
Installation
To use the Nocan library in the Arduino IDE, you should follow the steps outlined in the NoCAN installation tutorial. The tutorial describes how to configure the Arduino IDE board manager to work with NoCAN.
Library
To use the API, include <nocan.h> in your Arduino sketch.
Nocan.open
Synopsis
NocanNodeId Nocan.open()
Description
This function performs 3 main tasks:
- initialize the I2C interface in master mode,
- initialize the CAN bus driver (STM32F042)
- request a node id to be attributed to the node (based on a unique 8-byte serial number).
Return value
This function returns either:
- a value greater than 0 representing the node id attributed to the node.
- 0 if no node id was assigned to the node
- a value less than 0 in case of a hardware initialization issue
Nocan.close
Synopsis
int8_t Nocan.close()
Description
This function currently does nothing.
Nocan.lookupChannel
Synopsis
int8_t Nocan.lookupChannel(const char *channel, NocanChannelId *channel_id)
Description
This function looks up the value of channel_id corresponding to the string channel.
Return value
It returns 0 in case of success and a negative value in case of failure.
The value of channel_id is updated.
Nocan.registerChannel
Synopsis
int8_t Nocan.registerChannel(const char *channel, NocanChannelId *channel_id)
Description
This functions registers the channel named channel and obtains the corresponding channel_id.
Return value
It returns 0 in case of success and a negative value in case of failure.
The value of channel_id is updated.
Nocan.unregisterChannel
Synopsis
int8_t Nocan.unregisterChannel(uint8_t channel_id)
Description
This function unregisters the channel identified by channel_id.
Return value
It returns 0 in case of success and a negative value in case of failure.
Nocan.subscribeChannel
Synopsis
int8_t Nocan.subscribeChannel(NocanChannelId channel_id)
Description
This function subscribes the node to the channel identified by channel_id.
A node can subscribe to a maximum of 12 channels simultaneously.
Return value
It returns 0 in case of success and a negative value in case of failure.
Nocan.lookupAndSubscribeChannel(const char *channel)
Synopsis
int8_t Nocan.lookupAndSubscribeChannel(const char *channel, NocanChannelId *channel_id)
Description
This function simply a convenience function that combines the following 2 functions in one: lookupChannel and subscribeChannel.
Return value
It returns 0 in case of success and a negative value in case of failure.
Nocan.unsubscribeChannel
Synopsis
int8_t Nocan.unsubscribeChannel(NocanChannelId channel_id)
Description
This function is the opposite of Nocan.subscribeChannel: it signifies that the node will stop receiving messages from the channel channel_id.
Return value
It returns 0 in case of success and a negative value in case of failure.
Nocan.publishMessage
Synopsis
int8_t Nocan.publishMessage(NocanChannelID cid, const char *str)

int8_t Nocan.publishMessage(NocanMessage &msg)
Description
The first form of this function publishes a string str to the channel identified by cid, where str is a standard 0-terminated C string.
The alternate form of the function uses the following structure instead.
typedef struct {
    uint8_t node_id;
    uint16_t channel_id;
    uint8_t data_len;
    uint8_t data[64];
} NocanMessage
It enables to publish a message data of length data_len on the channel identified by channel_id.
data_len should be less than or equal to 64.
The value of node_id is automatically set by the function, based on the value obtained through Nocan.open().
The first form of the function is typically used to publish standard 0-terminated C strings.
In the Arduino platform, a simple way to convert data from a binary type such as "int" or "float"
to a string is to use the "String" data type
to do the conversion and then extract the converted value with the c_str() method as shown here:
  float pi;
  String temp_string;

  pi = 3.1415;
  pi_string = String(pi, 4);    // transform PI into string

  Nocan.publishMessage(cid, temp_string.c_str());        // publish to the network
For additional ideas, see the examples in the String description of the Arduino reference documentation.
Of course, it is not necessary to use standards C strings. The data field in a NocanMessage can be used to encode any type of data, as long as the total length of the encoded data is less than 64, using the alternate form of the function, which accepts
a structure instead of a simple string.
Return value
It returns 0 in case of success and a negative value in case of failure.
Nocan.receiveMessage
Synopsis
int8_t Nocan.receiveMessage(NocanMessage *msg)
Description
This function allows receiving Nocan messages of up to 64 bytes. It will wait up to 250ms for a message: if no message is received after this delay, the function returns an error. The function Nocan.receivePending() can be used to check if a message is available before calling Nocan.receiveMessage, thereby avoiding a busy wait.
The received message has the following structure:
typedef struct {
    uint8_t node_id;
    uint16_t channel_id;
    uint8_t data_len;
    uint8_t data[64];
} NocanMessage
Where:
node_idis the address of the node (seeNocan.open()).channel_idis the channel identifier of the received message.data_lenis a number between 0 and 64 describing the length of the message.datais the actual message.
Return value
It returns 0 in case of success and a negative value in case of failure.
Nocan.getUniqueDeviceIdentifier
Synopsis
int8_t Nocan.getUniqueDeviceIdentifier(uint8_t *dest)
Description
This function populates dest with the 8-byte serial number of the device.
dest must point to an array of at least 8 bytes.
Return value
It returns 0 in case of success and a negative value in case of failure.
Nocan.receivePending
Synopsis
bool Nocan.receivePending()
Description
This function returns 1 if an incoming message is pending, and 0 otherwise.
If a message is pending, it can be read with Nocan.receiveMessage().
Return value
1 if a message is pending, 0 otherwise.
Nocan.transmitPending
bool Nocan.transmitPending()
Description
This function returns 1 if the transmit buffer is full, and 0 otherwise.
Return value
1 if a message is pending, 0 otherwise.
Nocan.led
void Nocan.led(bool on)
Description
This function controls the network led (green) of the CANZERO.
When on is true, the led is turned on.
When on is false, the led is turned off.
Note that this led should not be confused with the user-defined led on the CANZERO (orange).
Return value
None.
Examples
DS18B20 temperature sensor
The code below shows a full sketch of an Omzlo CANZERO application that reads data from a DS18B20 temperature sensor and broadcasts it to the channel called "temperature".
#include <OneWire.h>
#include <DallasTemperature.h>
#include <nocan.h>

#define ONE_WIRE_BUS 2

OneWire oneWire(ONE_WIRE_BUS);
DallasTemperature sensors(&oneWire);
NocanChannelId tid;

void setup() {
  // put your setup code here, to run once:
  sensors.begin();
  for (;;)
  {
     if (Nocan.open()>=0)
        break;
     delay(1000);
  }
  Nocan.registerChannel("temperature",&tid);
}

void loop() {
  // put your main code here, to run repeatedly:
  float temp;
  String temp_string;

  sensors.requestTemperatures();    // this takes some time

  temp = sensors.getTempCByIndex(0);
  temp_string = String(temp, 2);    // transform temp into string

  Nocan.publishMessage(tid, temp_string.c_str());        // publish to the network

  delay(1000);
}
LCD display
Once the above sketch for the DS18B20 is running on an Omzlo CANZERO, you could add a second Omzlo CANZERO node with an LCD shield. It's very simple to publish the temperature from the previous example on the LCD by simply using the following sketch.
#include <LiquidCrystal.h>
#include <nocan.h>

// initialize the library with the numbers of the interface pins
LiquidCrystal lcd(7, 6, 5, 4, 3, 2);
NocanChannelId cid;

// Initialization
void setup()
{
  lcd.begin(16, 2);
  lcd.print("OMZLO ONE SAYS:");
  lcd.setCursor(0, 1);
  lcd.print("Initializing....");

  for (;;)
  {
    if (Nocan.open() < 0)
      delay(1000);
    else
      break;
  }

  Nocan.registerChannel("lcd",&cid);
  Nocan.subscribeChannel(cid);

  lcd.setCursor(0, 1);           // set the cursor to column 0, line 1
  lcd.print("Waiting.........");
}

// main loop
void loop()
{
  int i;
  NocanMessage msg;
  int8_t status = Nocan.receiveMessage(&msg);

  if (status==0)
  {
      if (msg.data_len>16) msg.data_len=16;
      while (msg.data_len<16) msg.data[msg.data_len++]=' ';
      msg.data[msg.data_len]=0;

      lcd.setCursor(0, 1);
      lcd.print((const char *)msg.data);
  }
}
Controlling a relay
In the following sketch, we create a channel called 'relay'. Sending a message starting with '1' or 'c' on that channel closes the relay while sending a message that starts with '0' or 'o' opens the relay. You can control the relay with commands such as 'nocanc publish relay 1' or 'nocanc publish relay 0'.
The relay is controlled by the Arduino pin 0, which is also the default on our Omzlo MKR Relay Shield, but you can change that pin by simply changing the value of RELAY_PIN.
#include <nocan.h>

#define RELAY_PIN 0

void setup() {
  NocanChannelId cid;

  Nocan.open();
  Nocan.registerChannel("relay", &cid);
  Nocan.subscribeChannel(cid);
  pinMode(RELAY_PIN, OUTPUT);
  digitalWrite(RELAY_PIN, LOW);
}

void loop() {
  NocanMessage msg;

  if (Nocan.receivePending())
  {
    Nocan.receiveMessage(&msg);
    if (msg.data_len>=1)
    {
      switch (msg.data[0]) {
        case 'c':
        case 'C':
        case '1':
          digitalWrite(RELAY_PIN, HIGH);
          break;
        case 'o':
        case 'O':
        case '0':
          digitalWrite(RELAY_PIN, LOW);
          break;
      }
    }
  }
  else
  {
    delay(100);
  }
}
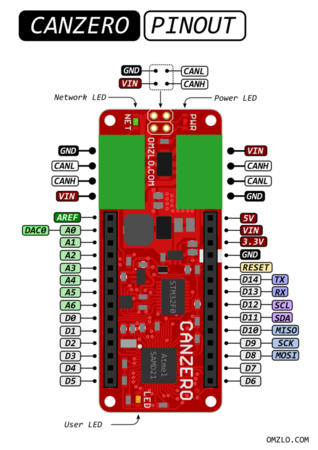
CANZERO specific notes
As in most Arduino-compatible boards, the orange user LED is defined as LED_BUILTIN, e.g.:
pinMode(LED_BUILTIN, OUTPUT);
digitalWrite(LED_BUILTIN, HIGH);
To send data on the serial interface (pin 13 and 14), you will need to refer to the Serial1 interface, e.g.:
Serial1.begin(9600);
Serial1.println("Hello world");